Nadja Cosplay: A Vampire Collar
 |
HISSSSSSSS!I was thinking of buying a collar from Italian Goth Couture brand Videnoir but by the time the sale started, I got out of bed, checked to see if how much VAT might be, they were sold out. (Future self will be faster on the keyboard next time they have a sale). Their next sale would have been too late for the event so I had to make one. Attempt #1I started with a paper version to get the approximate size and shape that I wanted and then used the template to cut and assemble the wire form. |
 |
Paper template out of poster board |
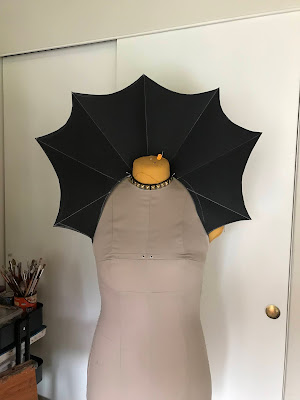
Hypothetically this was a fine approach but there were two issues. One: the tension wasn't right so I had to bend the upper wire until it stayed upright. I quite like the shape but it wasn't what I was going for. Two: There was no room for my head. So after it was all covered (I'll go over that later) I had to contour the wire so my head would have space to move. This shrunk the collar, again not what I was going for.
 |
| Paper collar vs. wire collar. |
Attempt #2. This method worked so all the details are here!
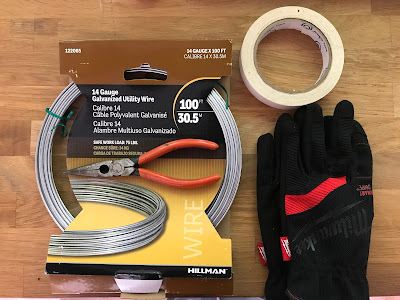
Materials:
 |
Wire Frame:
Making the Wire form
 | ||||||
| Wire frame of the collar loosely assembled. I started with the base piece. I marked the middle part with a sharpie and then bent it around the form, following the contour of the back of the neck, over the shoulder and down the front. I used a couple pins crossed, to hold it to the form. I wish I had U or T shaped pins. They would have been great. For the next part, if you want to play along and not be able to read the rest of this post, take a drink every time I say "spoke". The spokes were added next. I marked the base wire where I wanted the spokes to be, with a sharpie. They are about 2" apart. I bent the end of the spoke that attached to the base wire to approximately a 90 degree angle, left about an inch of wire after the bend, and taped it to the base wire with painters tape. I taped the other side of the spoke to keep it from sliding around and I also taped the base of each spoke, I can't tell you why, I just did. I started with the middle spoke and worked outwards. They won't stand up at this point, but that is ok. I recommend putting a red clip/piece of highly visible tape, on the loose end of each wire so you didn't put an eye out. Going for vampire here, not pirate. The top wire was the last part. I didn't want to affix the top wire permanently at this point because of the way I cover it with fabric. Starting at the middle and working outwards, I started to shape the top wire. I used the paper template to get the approximate the length of each spoke, and distance from spoke to spoke, and loosely taped the spokes to the top wire. Once they were in place I bent the top of the spoke to the approximate angle of the top wire so I would have a nice and smooth tip line. There was quite a bit of adjusting to get the curve right and the spokes in place, and to make sure the tension is correct. At this point the collar will stand up! Mine is absolutely not perfect if you take a measuring tape to it, but I'm cool with it. Covering the wire form1. Cover the spokes with some sort of fabric channels. I used satin bias tape I made out of Joann's matte satin to cover the wire frame. I could have used boning channels for the spokes but I wanted it to be pretty. For the mock-up collar I hand stitched the bias tape into a tube using a whip stitch but that takes forever. The reason I did it that way for the first one is because I had taped up the whole wire form before covering it and didn't have a choice in the matter. So to be more efficient the second time around I machine stitched the bias tape into tubes and then slipped them over the spokes before attaching the spokes to the top wire. They length of the channels needs to cover the whole spoke from top to base. The channels don't need to be finished on the ends because they will be covered.
 |

 | ||||
Finished collars. Top one is the final one, and bottom is the mock-up.Decorating the collar!I ordered sequin and beaded lace trim and a few appliqués for decoration. I cut apart the lace and positioned it so it would lay flat and so I could build up different parts of the collar. Pinning it down and I went. I didn't have enough lace to cover it up completely so I built up most of it on the edge and the front and left most of the part behind my head empty. This ended up being a happy accident because hair gets caught on the sequins so it would have driven me nuts.
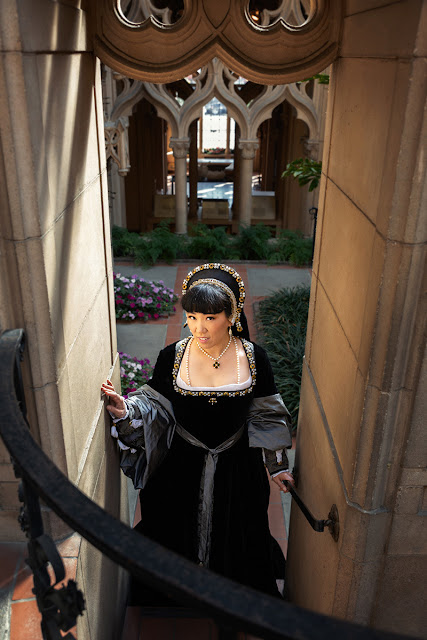
I worked around the edges and the spokes before using tiny and strategic stitches to sew down the middle parts of the lace. The back isn't completely covered so I didn't want the stitches to be super obvious from the back. This took ages because the frame is so cumbersome. Sometimes it worked like an embroidery hoop and sometimes it was just super annoying. I found holding it like a harp worked at some points... How it stays on. There is a piece of elastic that runs from the bottom points. This goes behind my back and keeps it on nice and securely but not so I can't move. The elastic is hidden under my corset. Conclusion This was a super fun project and made me want to do more sculptural elements in my costumes. It was quite time consuming but I like a good hand sewing project like this.
|


Comments
Post a Comment